PHP中间件ICE,ICE的安装配置,ICE常见编译和运行(异常)错误
ICE(Internet Communications Engine)是Zeroc提供的一款高性能的中间件。使用ICE能使得php(或c++,java,python)与java,c++,.net,python等进行交互。基于ICE可以实现电信级的解决方案。
1。为什么要使用中间件?
设想一个这样的场景:对于一个大型网站来说,往往有很多个web服务器,每个web服务器都存在很多对于数据库的操作。如果直接在php程序上直接操作数据库,那么势必要在每台web服务器都配置数据库的用户名,密码等信息,这是极度不安全的。并且如果我们要统一对数据库的操作进行管理和修改等,那么久要去每个web服务器上修改。因此,这时候中间件就产生了。它是基于SOA(面向服务架构)的思想,将对数据库的操作统一成一个服务,放置于一台服务机上,每个web服务器要对数据库进行操作,就可以直接访问这个提供中间件服务的服务器。
还有一点,考虑到性能问题,这里的提供服务的机子我们不使用html和xml传输数据,一般使用TCP,UDP这层的通信。
因此ICE就是现在非常流行的网站开发中间件之一。
2 ICE通信结构
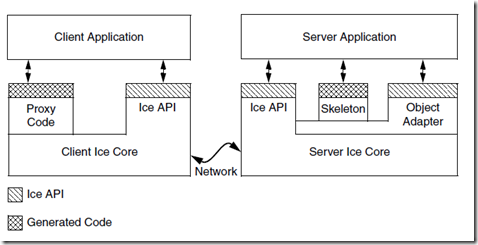
ICE有分为提供服务的一方Server和寻求服务的一方Client,两台机子上都需要安装ICE组件,他们的通信结构如下:

Client端应该事先知道Server端能提供的服务是什么,有什么格式?这就是图中的Proxy Code,在Proxy Code中定义好了类和接口。Server端中接口定义的就是Skeleton,具体实现接口的是Server Application,Server Application可以是C++,java,C#等写的,但是ICE不提供PHP写Server端。
3 安装ICE
安装环境: CentOS
1)
cd /etc/yum.repos.d/
wget http://www.zeroc.com/download/Ice/3.4/rhel5/zeroc-ice.repo
2)
编辑zeroc-ice.repo:
[zeroc-ice]
name=Ice 3.4 for Red Hat Enterprise Linux $releasever - $basearch
baseurl=http://www.zeroc.com/download/Ice/3.4/rhel5/$basearch
enabled=1
gpgcheck=1
gpgkey=http://www.zeroc.com/download/RPM-GPG-KEY-zeroc-release
3)
使用yum安装
yum install ice* db46* mcpp-devel
4)
确认机子是否安装g++,如果没有,则安装:
yum install gcc-c++ libstdc++-devel
linux环境下安装PHP中间件ICE
ICE的安装方式有多种,这里以通过RPM的方式进行安装为例:
1、下载ICE安装包:
wget http://www.zeroc.com/download/Ice/3.4/Ice-3.4.1-rhel5-i386-rpm.tar.gz
ICE各版本对系统有要求,下载之前需要确认一下自己服务器的环境是否支持,我们这里下载的是3.4.1版本。
2、解压
tar -zxvf Ice-3.4.1-rhel5-i386-rpm.tar.gz
解压后我们可以看到所有的rpm安装包:
-rw-r--r-- 1  503 users  1312303 2010-06-04 db48-4.8.30-1ice.rhel5.i386.rpm
-rw-r--r-- 1  503 users    51901 2010-06-04 db48-devel-4.8.30-1ice.rhel5.i386.rpm
-rw-r--r-- 1  503 users  1157525 2010-06-04 db48-java-4.8.30-1ice.rhel5.i386.rpm
-rw-r--r-- 1  503 users   111963 2010-06-04 db48-utils-4.8.30-1ice.rhel5.i386.rpm
-rw-r--r-- 1  503 users   112755 2010-06-04 ice-3.4.1-1.rhel5.noarch.rpm
-rw-r--r-- 1 root root  18987481 2011-04-24 Ice-3.4.1-rhel5-i386-rpm.tar.gz
-rw-r--r-- 1  503 users   540689 2010-06-04 ice-c++-devel-3.4.1-1.rhel5.i386.rpm
-rw-r--r-- 1  503 users  2817314 2010-06-04 ice-java-3.4.1-1.rhel5.noarch.rpm
-rw-r--r-- 1  503 users   287932 2010-06-04 ice-java-devel-3.4.1-1.rhel5.i386.rpm
-rw-r--r-- 1  503 users  3252074 2010-06-04 ice-libs-3.4.1-1.rhel5.i386.rpm
-rw-r--r-- 1  503 users   195082 2010-06-04 ice-php-3.4.1-1.rhel5.i386.rpm
-rw-r--r-- 1  503 users    66550 2010-06-04 ice-php-devel-3.4.1-1.rhel5.i386.rpm
-rw-r--r-- 1  503 users  1036142 2010-06-04 ice-python-3.4.1-1.rhel5.i386.rpm
-rw-r--r-- 1  503 users    31417 2010-06-04 ice-python-devel-3.4.1-1.rhel5.i386.rpm
-rw-r--r-- 1  503 users   223937 2010-06-04 ice-ruby-3.4.1-1.rhel5.i386.rpm
-rw-r--r-- 1  503 users    25127 2010-06-04 ice-ruby-devel-3.4.1-1.rhel5.i386.rpm
-rw-r--r-- 1  503 users  3241350 2010-06-04 ice-servers-3.4.1-1.rhel5.i386.rpm
-rw-r--r-- 1  503 users   170534 2010-06-04 ice-sqldb-3.4.1-1.rhel5.i386.rpm
-rw-r--r-- 1  503 users  4500205 2010-06-04 ice-utils-3.4.1-1.rhel5.i386.rpm
-rw-r--r-- 1  503 users    90809 2010-06-04 mcpp-devel-2.7.2-2ice.rhel5.i386.rpm
3、安装
rpm -ivh ice-3.4.1-1.rhel5.noarch.rpm
rpm -ivh db48-*.rpm
rpm -ivh mcpp-devel-2.7.2-2ice.rhel5.i386.rpm
rpm -ivh ice-libs-3.4.1-1.rhel5.i386.rpm
rpm -ivh ice-c++-devel-3.4.1-1.rhel5.i386.rpm
rpm -ivh ice-java-*.rpm
rpm -ivh ice-php-*.rpm
rpm -ivh ice-utils-3.4.1-1.rhel5.i386.rpm
rpm -ivh ice-servers-3.4.1-1.rhel5.i386.rpm
rpm -ivh ice-sqldb-3.4.1-1.rhel5.i386.rpm
这里我们可以根据自己的编程语言选择相应的安装包,上面我们安装了:c++、java、php
需要提醒的是,我们是通过rpm -ivh的方式进行安装,安装过程中注意包之间的依赖关系,按顺序安装。默认会安装到/usr/ 目录下,执行文件在/usr/bin目录下 include lib分别在/usr/include 和 /usr/lib 这里不用我多说…… 执行下 slice2cpp 提示no input file 就证明ICE环境已经可以工作啦。
另外,我们可以通过下面的两个命令查看安装的ICE版本
icegridnode --version
icegridadmin --version
php中通过直接编译的方式去安装ICE
上面我们讲过了在linux环境下通过rpm的方式来安装ICE,这种安装方式可以是比较简单的,自己在安装过程中发现后面PHP无法装在IcePHP.sp模块,也有可能自己在安装过程中某个地方出错了。又尝试通过直接编译的方式去安装ICE,PHP也正常装在了IcePHP.so模块,大功告成,这里记录一下方法。
以安装ICE-3.4.2版本为例,为了方便管理,将ICE相关的软件都安装到/usr/local/ICE-3.4.2/目录下。
一、安装第三方包:ThirdParty-Sources-3.4.2
1、解压安装包
# tar zxvf ThirdParty-Sources-3.4.2.tar.gz
# cd ThirdParty-Sources-3.4.2
2、安装mcpp
# tar zxvf mcpp-2.7.2.tar.gz
# cd mcpp-2.7.2
# ./configure --prefix=/usr/local/ICE-3.4.2/mcpp-2.7.2/ CFLAGS=-fPIC -enable-mcpplib -disable-shared
# make
# make install
3、安装Berkeley DB
Berkeley DB 是一个高性能的,嵌入数据库编程库,和C语言, C++, Java, Perl, Python, Tcl以及其他很多语言都有绑定。
# cd ..
# tar zxvf db-4.8.30.NC.tar.gz
# cd db-4.8.30.NC/build_unix/
# ../dist/configure --prefix=/usr/local/ICE-3.4.2/BerkeleyDB.4.6/ -enable-cxx
# make
# make install
4、安装bzip2
bzip2 是 Julian Seward 开发并按照自由软件/开源软件协议发布的数据压缩算法及程序。
# cd../../
# tar zxvf bzip2-1.0.6.tar.gz
# cd bzip2-1.0.6
修改Makefile,将PREFIX指向/usr/local/ICE-3.4.2/bzip2-1.0.6
# make
# make install
5、安装expat
expat 是一个 XML parsing C library。
# cd ..
# tar zxvf expat-2.0.1.tar.gz
# cd expat-2.0.1
# ./configure --prefix=/usr/local/ICE-3.4.2/expat-2.0.1/
# make
# make install
6、安装openssl
openssl 是 Secure Socket Layer (SSL) binary and related cryptographic tools。
# cd ..
# tar zxvf openssl-0.9.8r.tar.gz
# cd openssl-0.9.8r
# ./config --prefix=/usr/local/ICE-3.4.2/openssl
# make
# make install
二、安装ICE-3.4.2
# tar zxvf Ice-3.4.2.tar.gz
# cd Ice-3.4.2/cpp
# vi config/Make.rules
修改安装包路径:
prefix ?= /usr/local/ICE-3.4.2/Ice-$(VERSION)

embedded_runpath_prefix ?= /usr/local/ICE-3.4.2/Ice-$(VERSION_MAJOR).$(VERSION_MINOR)

BZIP2_HOME ?= /usr/local/ICE-3.4.2/bzip2-1.0.6

DB_HOME ?= /usr/local/ICE-3.4.2/BerkeleyDB.4.6

EXPAT_HOME ?= /usr/local/ICE-3.4.2/expat-2.0.1

OPENSSL_HOME ?= /usr/local/ICE-3.4.2/openssl

MCPP_HOME ?= /usr/local/ICE-3.4.2/mcpp-2.7.2
# make
编译过程报错:
../../lib/libIce.so: undefined reference to `libiconv'
../../lib/libIce.so: undefined reference to `libiconv_close'
../../lib/libIce.so: undefined reference to `libiconv_open'
collect2: ld 返回 1
make[2]: *** [../../bin/transformdb] 错误 1
make[2]: Leaving directory `/data/software/Ice-3.4.2/cpp/src/FreezeScript'

make[1]: *** [all] 错误 1
make[1]: Leaving directory `/data/software/Ice-3.4.2/cpp/src'
make: *** [all] 错误 1
# make install
安装过程报错:
../../lib/libIce.so: undefined reference to `libiconv'
../../lib/libIce.so: undefined reference to `libiconv_close'
../../lib/libIce.so: undefined reference to `libiconv_open'
collect2: ld 返回 1
make[2]: *** [../../bin/transformdb] 错误 1
make[2]: Leaving directory `/data/software/Ice-3.4.2/cpp/src/FreezeScript'
make[1]: *** [install] 错误 1
make[1]: Leaving directory `/data/software/Ice-3.4.2/cpp/src'
make: *** [install] 错误 1
修改
vim config/Make.rules.Linux
找到143行这里
BASELIBS = -lIceUtil -lpthread -lrt -liconv
在最后面增加-liconv, 执行make和make instll命令等待编译完成.
至此,安装ICE完毕。
3、编译PHP版本
# cd ..
# cd php/
# vim config/Make.rules.php
指定安装包路径:
prefix ?= /usr/local/ICE-3.4.2/Ice-$(VERSION)

embedded_runpath_prefix ?= /usr/local/ICE-3.4.2/Ice-$(VERSION_MAJOR).$(VERSION_MINOR)

#指定PHP安装路径
PHP_HOME ?= /usr/local/php
安装编译
# make
# make install
4、设置ICE环境变量
# vi /etc/profile
export PHPPATH=/usr/local/ICE-3.4.2/Ice-3.4.2/php/:
export ICE_HOME=/usr/local/ICE-3.4.2/Ice-3.4.2
export PATH=$PATH:$ICE_HOME/bin
export LD_LIBRARY_PATH=$ICE_HOME/lib
export PATH USER LOGNAME MAIL HOSTNAME HISTSIZE INPUTRC ICE_HOME
使之生效
source /etc/profile
测试是否成功:
icegridnode --version
icegridadmin --version
Linux环境下make编译安装ICE-3.3.0
Linux环境下make编译安装ICE-3.3.0
环境:
Linux+lnmp
PHP5.2.17
1、下载安装包:
#wget http://www.zeroc.com/download/Ice/3.3/Ice-3.3.1.zip

#wget http://www.zeroc.com/download/Ice/3.3/ThirdParty-Sources-3.3.1.tar.gz
这里提醒一下,安装PHP ICE需要注意PHP版本和ICE版本,PHP 5.2只能用 ICE-3.3.X版本。
2、安装步骤
1)、解压安装包
#tar zxvf ThirdParty-Sources-3.3.1.tar.gz
2)、安装mcpp
#tar zxvf mcpp-2.7.2.tar.gz

#cd mcpp-2.7.2

#./configure --prefix=/usr/local/ICE-3.3.0/mcpp-2.7.2/ CFLAGS=-fPIC -enable-mcpplib -disable-shared

#make

#make install
3)、安装Berkeley DB
# tar zxvf db-4.6.21.NC.tar.gz

# cd db-4.6.21.NC

# cd build_unix/

# ../dist/configure --prefix=/usr/local/ICE-3.3.0/BerkeleyDB.4.6/ -enable-cxx

# make

# make install
4)、安装bzip2
# tar zxvf bzip2-1.0.5.tar.gz

# cd bzip2-1.0.5
修改Makefile文件:
# vim Makefile
#修改PREFIX指向
# Where you want it installed when you do 'make install'
# PREFIX=/usr/local
PREFIX=/usr/local/ICE-3.3.0/bzip2-1.0.5
# make

# make install
5)、安装expat
# tar zxvf expat-2.0.1.tar.gz

# cd expat-2.0.1

# ./configure --prefix=/usr/local/ICE-3.3.0/expat-2.0.1/

# make

# make install
6)、安装openssl
# tar zxvf openssl-0.9.8g.tar.gz

# cd openssl-0.9.8g

# ./config --prefix=/usr/local/ICE-3.3.0/openssl

# make

# make install
7)、安装ICE-3.3.1
# tar zxvf Ice-3.3.1.zip

# cd Ice-3.3.1/cpp/

# vim config/Make.rules
修改:
#
# Select an installation base directory. The directory will be created
# if it does not exist.
#
prefix                   ?= /usr/local/ICE-3.3.0/Ice-$(VERSION)

#
# The "root directory" for runpath embedded in executables. Can be unset
# to avoid adding a runpath to Ice executables.
#
embedded_runpath_prefix  ?= /usr/local/ICE-3.3.0/Ice-$(VERSION_MAJOR).$(VERSION_MINOR)

# If libbzip2 is not installed in a standard location where the
# compiler can find it, set BZIP2_HOME to the bzip2 installation
# directory.
#
BZIP2_HOME              ?= /usr/local/ICE-3.3.0/bzip2-1.0.5

# If Berkeley DB is not installed in a standard location where the
# compiler can find it, set DB_HOME to the Berkeley DB installation
# directory.
#
DB_HOME         ?= /usr/local/ICE-3.3.0/BerkeleyDB.4.6

# If expat is not installed in a standard location where the compiler
# can find it, set EXPAT_HOME to the expat installation directory.
#
EXPAT_HOME              ?= /usr/local/ICE-3.3.0/expat-2.0.1

#
# If OpenSSL is not installed in a standard location where the
# compiler can find it, set OPENSSL_HOME to the OpenSSL installation
# directory.
#
OPENSSL_HOME            ?= /usr/local/ICE-3.3.0/openssl

#
# If Mcpp is not installed in a standard location where the  compiler
# can find it, set MCPP_HOME to the Mcpp installation directory.
#
MCPP_HOME               ?= /usr/local/ICE-3.3.0/mcpp-2.7.2
修改:(如果直接make可以成功,则忽略该修改)
# vim config/Make.rules.Linux

#修改BASELIBS值,在末尾添加-liconv
BASELIBS                = -lIceUtil -L$(NPTL_LIB) -lpthread -lrt -liconv
编译安装:
# make

# make install
8)、编译安装 PHP 版本
# cd ../php

# vim config/Make.rules
参照ICE修改相应配置,并修改PHP_HOME路径:
# Select an installation base directory. The directory will be created
# if it does not exist.
#

prefix                  ?= /usr/local/ICE-3.3.0/Ice-$(VERSION)

#
# The "root directory" for runpath embedded in executables. Can be unset
# to avoid adding a runpath to Ice executables.
#
embedded_runpath_prefix  ?= /usr/local/ICE-3.3.0/Ice-$(VERSION_MAJOR).$(VERSION_MINOR)


# If you've installed a distribution, or PHP was included with
# your system, then you likely need to review the values of
# PHP_INCLUDE_DIR and PHP_LIB_DIR.
#

PHP_HOME                ?= /usr/local/php
编译安装:
# make

# make install
复制 IcePHP.so到PHP extension_dir目录:
# cp -p /usr/local/ICE-3.3.0/Ice-3.3.1/lib/IcePHP.so /usr/local/php/lib/php/extensions/no-debug-non-zts-20060613/
修改PHP配置文件php.ini,添加IcePHP.so
; Directory in which the loadable extensions (modules) reside.
extension_dir = "/usr/local/php/lib/php/extensions/no-debug-non-zts-20060613/"
extension = "memcache.so"
extension = "pdo_MySQL.so"
extension = "IcePHP.so"
9)、重启服务,查看php -m或phpinfo
# /usr/local/php/bin/php -m


filter
ftp
gd
gettext
hash
ice
iconv
json
libxml

ICE提供 YUM 安装,这种安装方式最简单,但是安装成功后,ICE默认把PHP扩展安装到了系统默认自带的PHP中,一般情况下我们都不会自己使用linux系统自动的PHP版本,而是自己重新安装的,ICE通过YUM安装的方式无法对PHP进行安装扩展,这个问题有待解决。
4 写一个ICE例子,目的:Client端每调用一次服务,Server端就打出一个"hello world”;
基本环境:由于是实验目的,我仅仅将Client和Server同当做一台CentOS机子
A 建文件夹: mkdir ice_demo
B 创建文件Printer.ice,这个.ice文件是ICE的slice文件,在其中定义了服务的对象和接口
module Demo {
interface Printer {
void printString(string s);
};
};
C #slice2cpp Printer.ice //产生出了Printer.h和Printer.cpp两个文件
D 创建Server.cpp
#include <Ice/Ice.h>
#include <Printer.h>
using namespace std;
using namespace Demo;
class PrinterI : public Printer {
public:
virtual void printString(const string& s,
const Ice::Current&);
};
void
PrinterI::
printString(const string& s, const Ice::Current&)
{
cout << s << endl;
}
int
main(int argc, char* argv[])
{
int status = 0;
Ice::CommunicatorPtr ic;
try {
ic = Ice::initialize(argc, argv);
Ice::ObjectAdapterPtr adapter
= ic->createObjectAdapterWithEndpoints(
"SimplePrinterAdapter", "default -p 10000");
Ice::ObjectPtr object = new PrinterI;
adapter->add(object,
ic->stringToIdentity("SimplePrinter"));
adapter->activate();
ic->waitForShutdown();
} catch (const Ice::Exception& e) {
cerr << e << endl;
status = 1;
} catch (const char* msg) {
cerr << msg << endl;
status = 1;
}
if (ic) {
try {
ic->destroy();
} catch (const Ice::Exception& e) {
cerr << e << endl;
status = 1;
}
}
return status;
}
E
#c++ -I. -I$ICE_HOME/include -c Printer.cpp Server.cpp
# c++ -o server Printer.o Server.o \ -L$ICE_HOME/lib -lIce –lIceUtil //在同文件夹下会出现:server执行文件
F #slice2php Printer.ice
G 创建Client.php
<?php
require 'Ice.php';
require 'Printer.php';
$ic = null;
try
{
$ic = Ice_initialize();
$base = $ic->stringToProxy("SimplePrinter:default -p 10000");
$printer = Demo_PrinterPrxHelper::checkedCast($base);
if(!$printer)
throw new RuntimeException("Invalid proxy");
$printer->printString("Hello World!");
}
catch(Exception $ex)
{
echo $ex;
}
if($ic)
{
// Clean up
try
{
$ic->destroy();
}
catch(Exception $ex)
{
echo $ex;
}
}
?>
H
打开一个终端运行 #./server
打开另一个终端运行 php Client.php
发现每运行一次Client.php,第一个终端就打出一个Hello World. ICE 运行成功.
附注:大型的网站对于ICE的使用是很多的。比如需要实现一个分词搜索的功能使用lucence,对数据库的访问,对memcached的访问都可以直接在ICE中写一个服务来提供统一管理和使用。
再贴个PHP使用ICE的简单代码示例:
<?php
header('Content-Type:text/html;charset=utf-8');
require('Ice.php');
require('PPUserService.php');

try{
	$initData = new Ice_InitializationData;

	$initData->properties = Ice_createProperties();
	$initData->properties->load('/home/wwwroot/ice.test.com/props.cfg');

	$communicator = Ice_initialize($initData);
	$proxy = $communicator->stringToProxy('PP/PPUserService');

	$printer = com_cb_ppuserservice_serviceice_PPUserServiceIcePrxHelper::checkedCast($proxy);

	if(!$printer)
	{
		throw new RuntimeException("Invalid proxy");
	}

	$result = $printer->isProfileCompleted(8723504);
	var_dump($result);
}
catch(Exception $ex)
{
	echo $ex;
}
上面就是自己在调试ICE时使用的PHP代码,不过在调用接口过程中会出现一些问题:
如果接口返回bool类型值,接口调用正常;
如果接口返回对象类型值,接口报错,报"UnmarshalOutOfBoundsException"异常,正在查找这个问题是什么原因造成的。
过几天再对ICE这个进行总结一下...
1、建立ice文件Printer.ice
module Demo{
	interface Printer{
	void printString(string s);
	};
};
2、执行 slice2cpp Printer.ice 执行成功后可以看到当前目录下生成了 Printer.cpp 和 Printer.h 两个文件
3、新建Server.cpp
#include <Ice/Ice.h>
#include <Printer.h>

using namespace std;
using namespace Demo;

class PrinterI : public Printer {
public:
virtual void printString(const string& s,
const Ice::Current&);
};

void
PrinterI::
printString(const string& s, const Ice::Current&)
{
cout << s << endl;
}

int
main(int argc, char* argv[])
{
int status = 0;
Ice::CommunicatorPtr ic;
try {
ic = Ice::initialize(argc, argv);
Ice::ObjectAdapterPtr adapter
= ic->createObjectAdapterWithEndpoints(
"SimplePrinterAdapter", "default -p 10000");
Ice::ObjectPtr object = new PrinterI;
adapter->add(object,
ic->stringToIdentity("SimplePrinter"));
adapter->activate();
ic->waitForShutdown();
} catch (const Ice::Exception& e) {
cerr << e << endl;
status = 1;
} catch (const char* msg) {
cerr << msg << endl;
status = 1;
}
if (ic) {
try {
ic->destroy();
} catch (const Ice::Exception& e) {
cerr << e << endl;
status = 1;
}
}
return status;
}
4、编译Server.cpp,执行:
g++ -I. -I/usr/include -o server Printer.cpp Server.cpp -L/usr/lib -lIce -lIceUtil
成功后会在同一目录中生成server可执行文件。
5、创建PHP客户端,执行命令:
slice2php Printer.ice
成功后,会在同一目录中生成Printer.php文件
6、创建Client.php
<?php
require 'Ice.php';
require 'Printer.php';

$ic = null;
try
{
$ic = Ice_initialize();
$base = $ic->stringToProxy("SimplePrinter:default -p 10000");
$printer = Demo_PrinterPrxHelper::checkedCast($base);
if(!$printer)
throw new RuntimeException("Invalid proxy");

$printer->printString("Hello World!");
}
catch(Exception $ex)
{
echo $ex;
}

if($ic)
{
// Clean up
try
{
$ic->destroy();
}
catch(Exception $ex)
{
echo $ex;
}
}
?>
7、打开一终端执行:./server
8、打开另一终端执行:php Client.php
执行成功后,我们发现每执行一次php Client.php都会在服务终端输出 Hello World!
在php中使用ice教程
前面我们已经在linux环境下成功安装了支持PHP的ICE环境,接下来就是怎么在PHP使用ICE了。
1、修改PHP配置文件php.ini,载入ICE扩展
vim /usr/local/php/etc/php.ini
添加:
extension = "IcePHP.so"
重启服务
/etc/init.d/php-fpm reload
查看ICE是否载入成功:
1)通过命令查看已安装PHP扩展
[root@localhost ~]# php -m
显示:
gettext
gmp
hash
ice
iconv
libxml
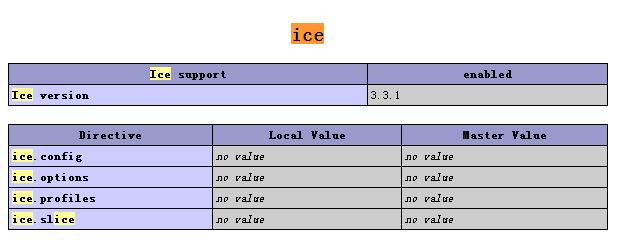
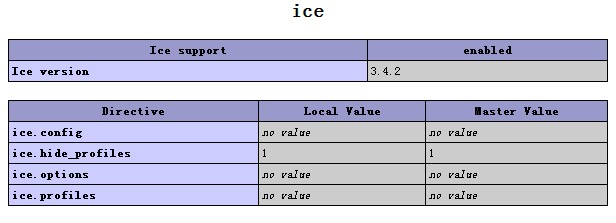
可以看到有ICE的身影了,说明已经成功了。
另外也可以通过phpinfo的方式查看:

接下来就是在应用中载入Ice了,这里我们可以查看官方是怎么介绍的:
Your application will also need to include at least some of the Ice for PHP run-time source files (installed in /usr/share/php on RHEL, Amazon Linux, and Ubuntu, and in /usr/share/php5 on SLES). This installation directory is included in PHP's default include path, which you can verify by executing the following command:
% php -i | grep include_path
If the installation directory is listed, no further action is necessary to make the run-time source files available to your application. Otherwise, you can modify the include_path setting in php.ini to add the installation directory:
include_path = /usr/share/php:...
Another option is to modify the include path from within your script prior to including any Ice run-time file:
PHP
ini_set('include_path', ini_get('include_path') . PATH_SEPARATOR . '/usr/share/php');
require 'Ice.php'; // Load the core Ice run time definitions.
ICE常见编译和运行(异常)错误
在编译和 Ice 应用相关的文件中,经常因为 ice 相关的文件包含关系而导致编译无法通过,此时的错误一般提示和 handle.h 相关。然而想要解决这样的错误,一般只需要把在无法编译成 .o 文件的 .cpp 文件中和 ice 文件相关的头文件放在该 .cpp 文件的起始行即可。也就是说,根据提示,把 .cpp 文件中最早提示导致出错的 .h 文件放在起始行。
ICE 的常见运行错误 ( 异常 ):
1 使用的地址错误 ,IP 并非本地 IP: 发生在初始化服务器时 , 没办法初始化 adapter.
错误信息 : (IP 错误 )
./test: Network.cpp:475: Ice::SocketException:

socket exception: Cannot assign requested address
另外 : 已经启动服务器后又重新启动 : 发生在初始化服务器时 , 没办法初始化 adapter.
错误信息 : (port 已经被使用 )
./server: Network.cpp:475: Ice::SocketException:

socket exception: Address already in use
///stringtoProxy 对于任何 string 都是有效的 , 均可以生成相应代理 , 但是该代理是否有效是无法保证的 . 如果代理无效 , 也就是说根本就没有这样的 adapter 或者对象 , 那么使用 Checkcast 或直接用该代理调用相应对象接口均会抛异常 . 下面对每种情况加于分析 .
2 使用的代理 IP 错误 : 发生在使用代理调用接口的时候
原因 : 根本就没有相应的通讯器存在 .
错误信息 : ( 使用的代理 IP 错误 )
抛出异常 : Ice::ConnectFailedException ( 需要几秒 , 需要进行搜索 )
3 使用的代理端口错误 , 两边不一致 : 发生在使用代理调用接口的时候
原因 : 存在通讯器 , 但是不存在相应的对象适配器 .
错误信息 :
抛出异常 : Ice::ConnectionRefusedException ( 很快 , 端口没有被启用引起的 , 无人监听该端口 )
4 使用的对象名字不正确 : 发生在使用代理调用接口的时候
原因 : 能够找到相应的对象适配器 , 但是该对象适配器中无法找到相应的对象
错误信息 :
抛出异常 : Ice::ObjectNotExistException ( 很快 )
5 对方程序没用启用 , 也就是服务器没有启用 : 发生在使用代理调用接口的时候
原因 : 根本就没有相应的通讯器存在 .
错误信息 :
抛出异常 : Ice::ConnectionRefusedException ( 很快 )
6 连接突然断开 ( 比如对方因为段错误而程序停止 , 或者在连接过程中正常关闭 ) : 发生在使用代理调用接口的时候 ( 连接丢失 )
原因 : 已经建立连接的对方突然断开
错误信息 :
warning: connection exception:

TcpTransceiver.cpp:217: Ice::ConnectionLostException:

connection lost: recv() returned zero

local address = 10.0.0.4:10050

remote address = 10.0.0.200:33412
( 服务器端的错误 , 使用 createObjectAdapter() 创建对象适配器 )
7 服务器端没有指定 adapter 的端口和 ip, 仅仅随便给了一个名字 , 并使用该名字从配置文件中读取信息 : 启动服务器时没有问题正常 , 但是客户端无法连接
原因 : 对象适配器无效来源 帮客之家www。bkjia.com
错误信息 :
抛出异常 : Ice::ConnectionRefusedException ( 很快 )
8 启动服务器时 , 给定的 adapter 的名字和配置文件中使用的不一致 : 启动服务器时没有问题正常 , 但是客户端无法连接 ( 无法从配置文件中获取所需要的信息 port 和 ip)
原因 : 对象适配器无效
错误信息 :
抛出异常 : Ice::ConnectionRefusedException ( 很快 )
9 配置文件中的名字和程序中给定的 adapter 名字一致 , 也就是说缺少 Endpoints, 作为后缀 . 启动服务器时没有问题正常 , 但是客户端无法连接 ( 无法从配置文件中获取所需要的信息 port 和 ip)
原因 : 对象适配器无效
错误信息 :
抛出异常 : Ice::ConnectionRefusedException ( 很快 )
10 配置文件中的名字后缀 Endpoints 写错 , 比如 Endpoint. 启动服务器时没有问题正常 , 但是客户端无法连接 ( 无法从配置文件中获取所需要的信息 port 和 ip)
原因 : 对象适配器无效
错误信息 :
抛出异常 : Ice::ConnectionRefusedException ( 很快 )
11 程序中给定的 adapter 名字多了后缀 Endpoints( 或者其他字符 , 甚至是 ”.”). 启动服务器时没有问题正常 , 但是客户端无法连接 ( 无法从配置文件中获取所需要的信息 port 和 ip)
原因 : 对象适配器无效
错误信息 :
抛出异常 : Ice::ConnectionRefusedException ( 很快 )
( 说明 : 也就是说配置文件中必须有 Endpoints 作为后缀 , 而在程序中给定 adapter 的名字是一定不能带该后缀 , 不然服务器无法正常工作 )


